Roux — First Block
Contents
Overview & Color Neutrality
In first block you want to solve a 1x2x3 block in the lower two-thirds of the L face. You can use whatever moves you want to do this, but you shouldn't rotate the cube (doing so is just a waste of time). There are no systematic rules for how to come up with efficient solutions, just intuition that you develop by practice. I will give some helpful common ways of thinking below through some examples.
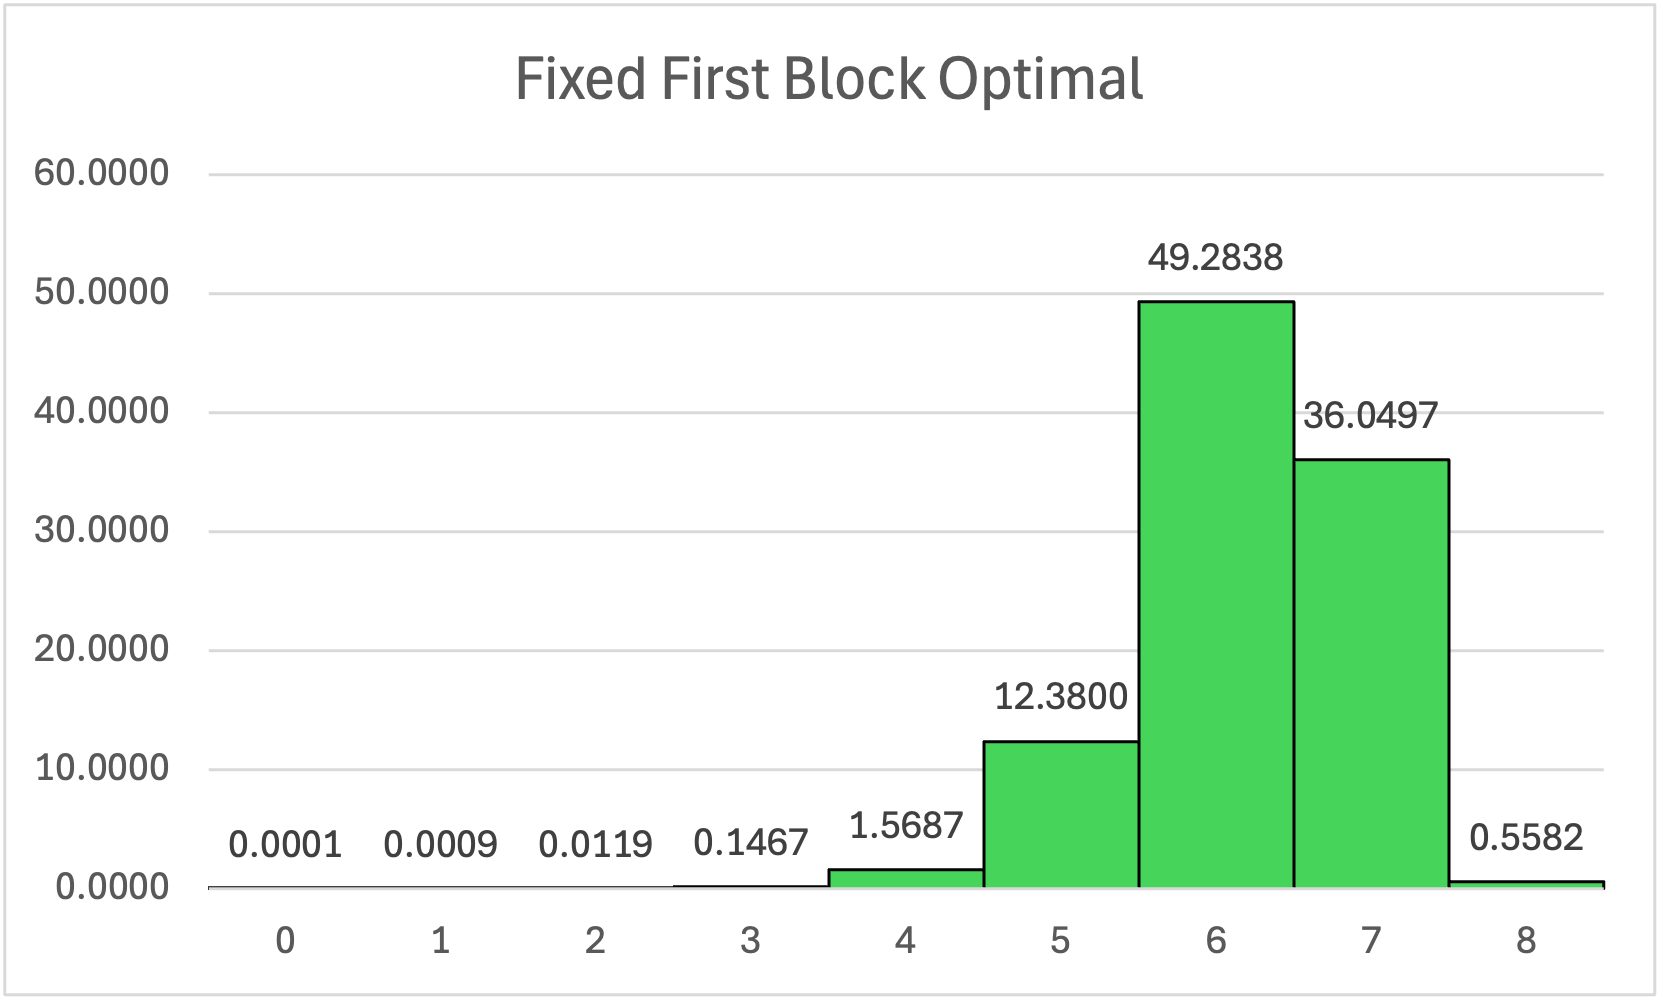
Before we go into actually solving first block, lets see how good it is theoretically possible to get at it. First block is the only step in Roux that can be made more efficient by being color neutral. Should you solve the same first block colors every time or should you learn to solve all blocks easily? How much of a difference does it make? I decided to answer this question mathematically. You can always pick up the cube so that the DL edge is solved by definition. This leaves the L center (6 possible permutations), BL (11 permutations, 2 orientations) and FL (10 permutations, 2 orientations) edges, and DBL (8 perms, 3 ors) and DFL (7 perms, 3 ors) corners to solve for first block. Together these give 1330560 possible cases once you have fixed which first block you are going to solve. This is a small enough number that I was able to write some Python code to solve every single case optimally in STM.
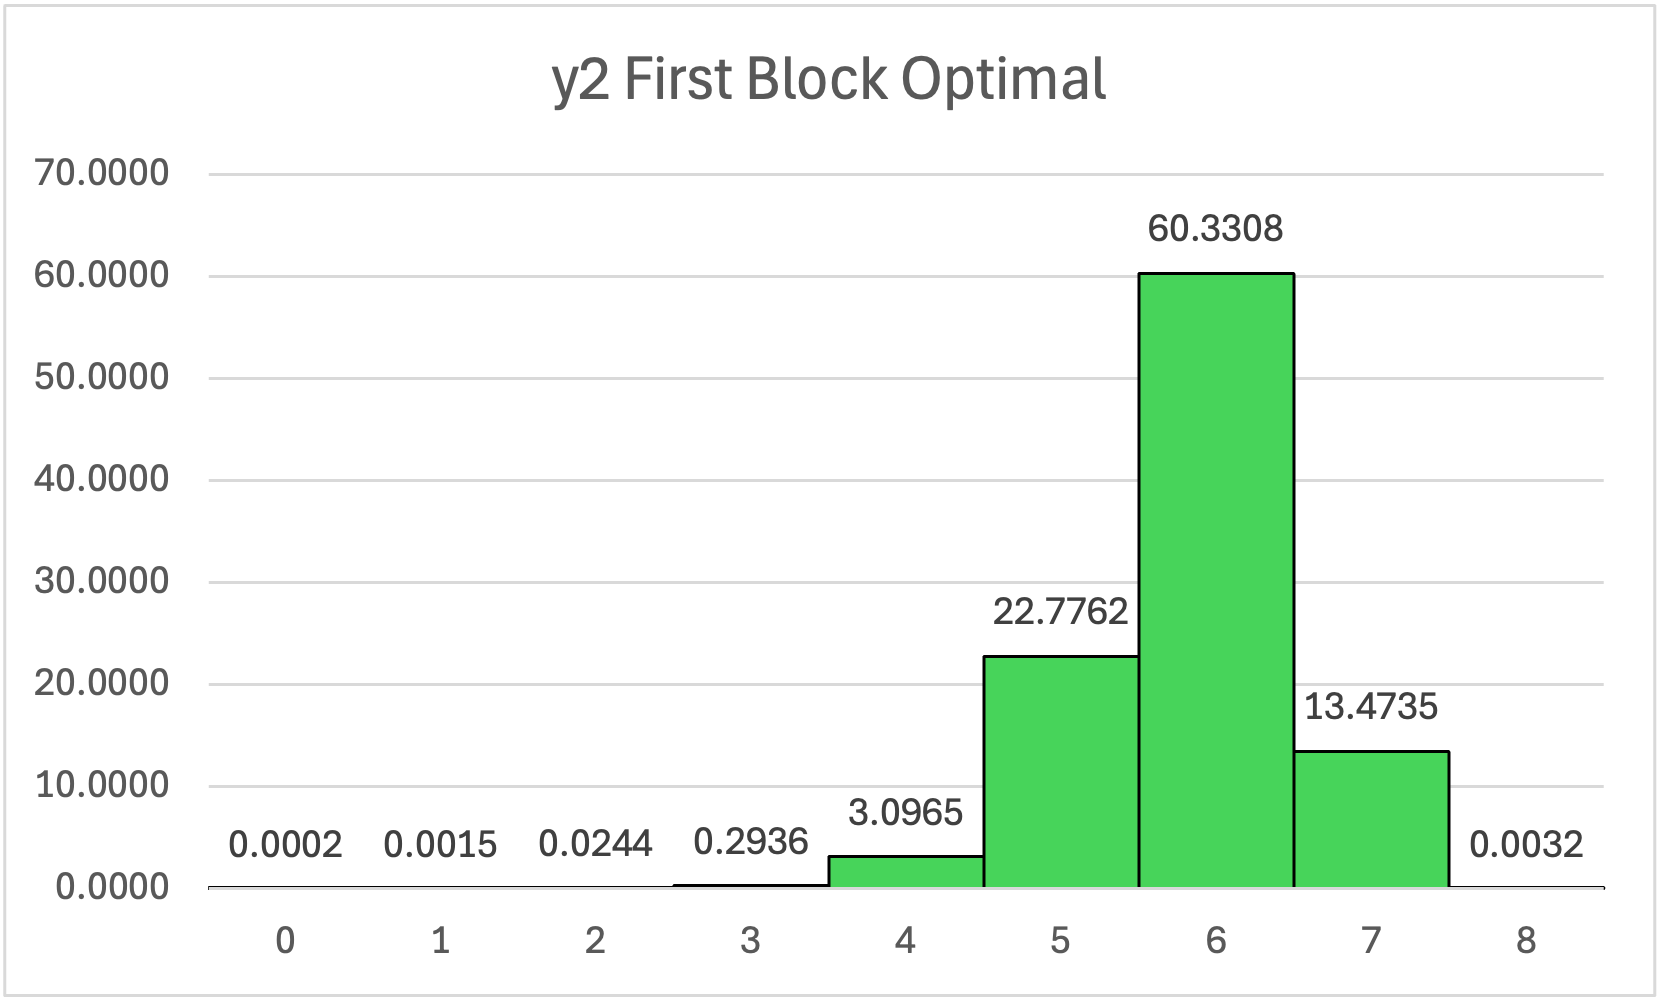
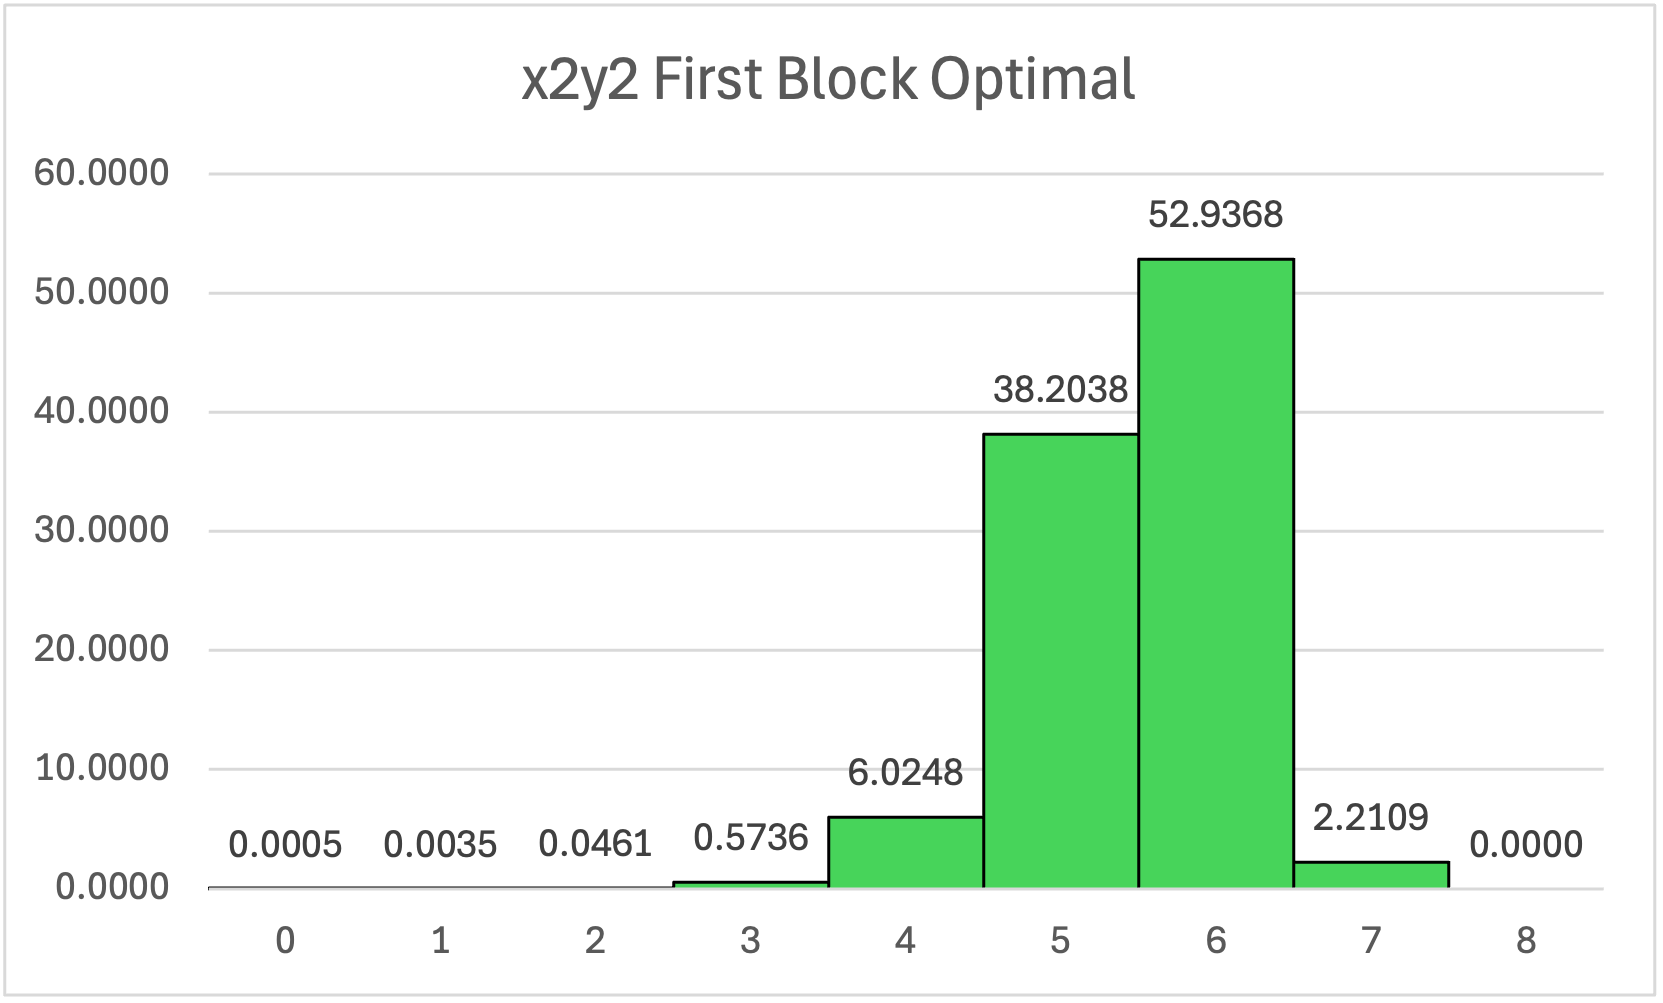
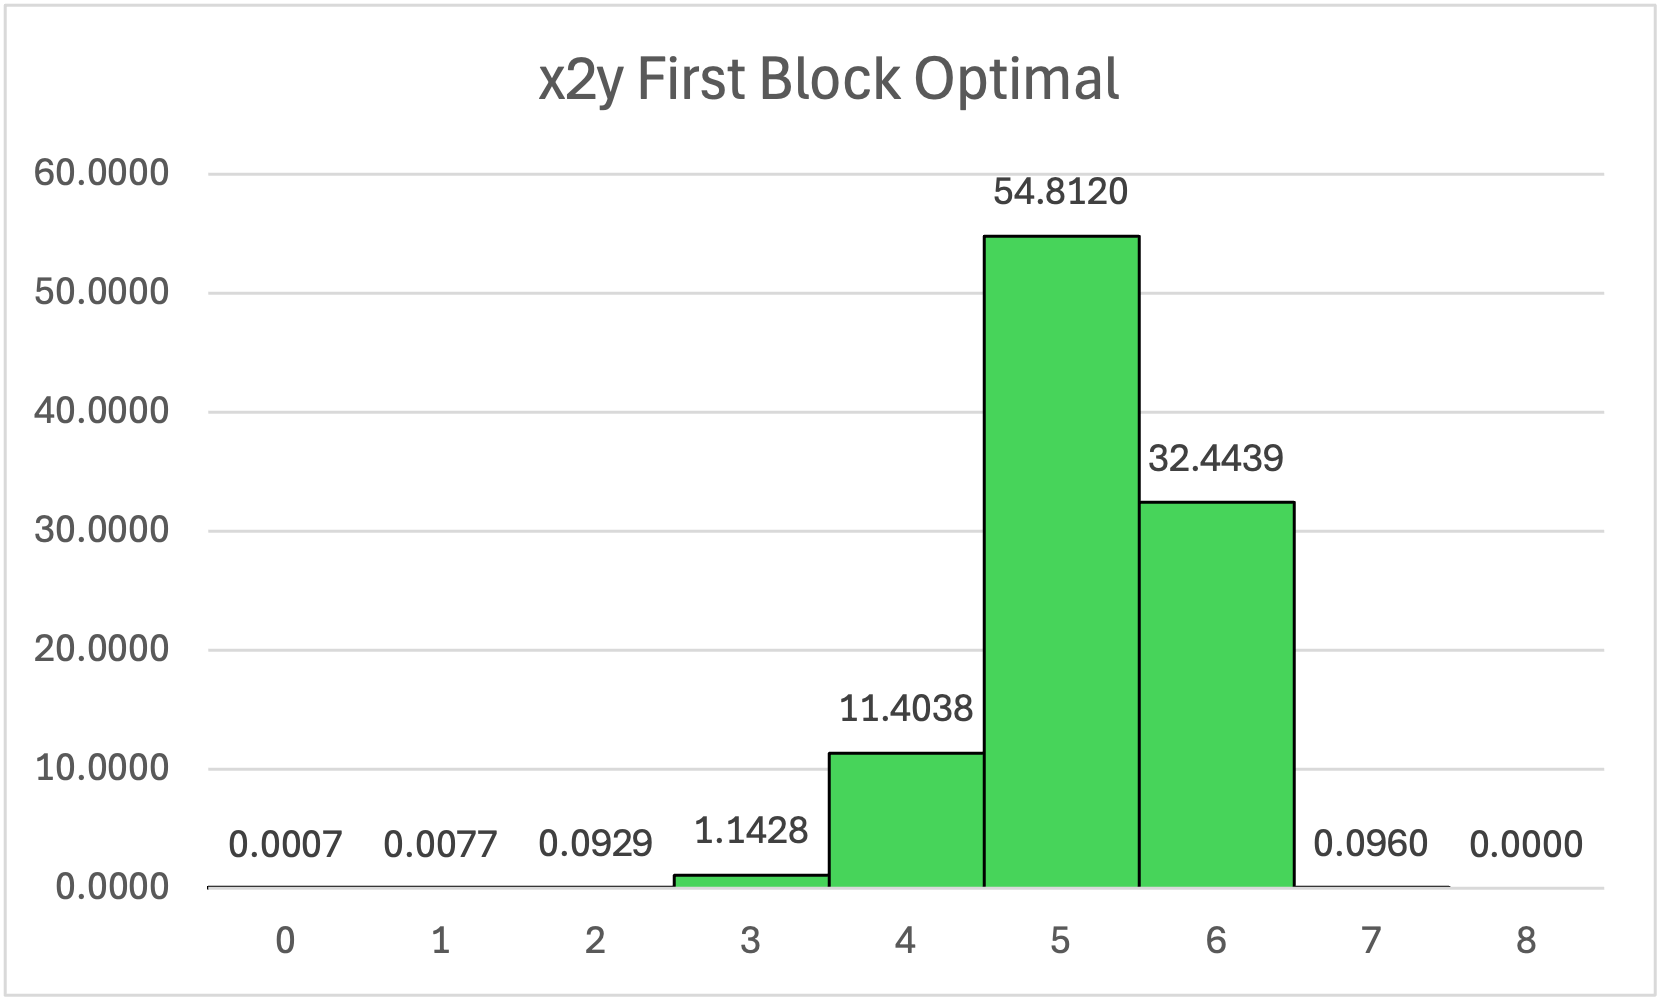
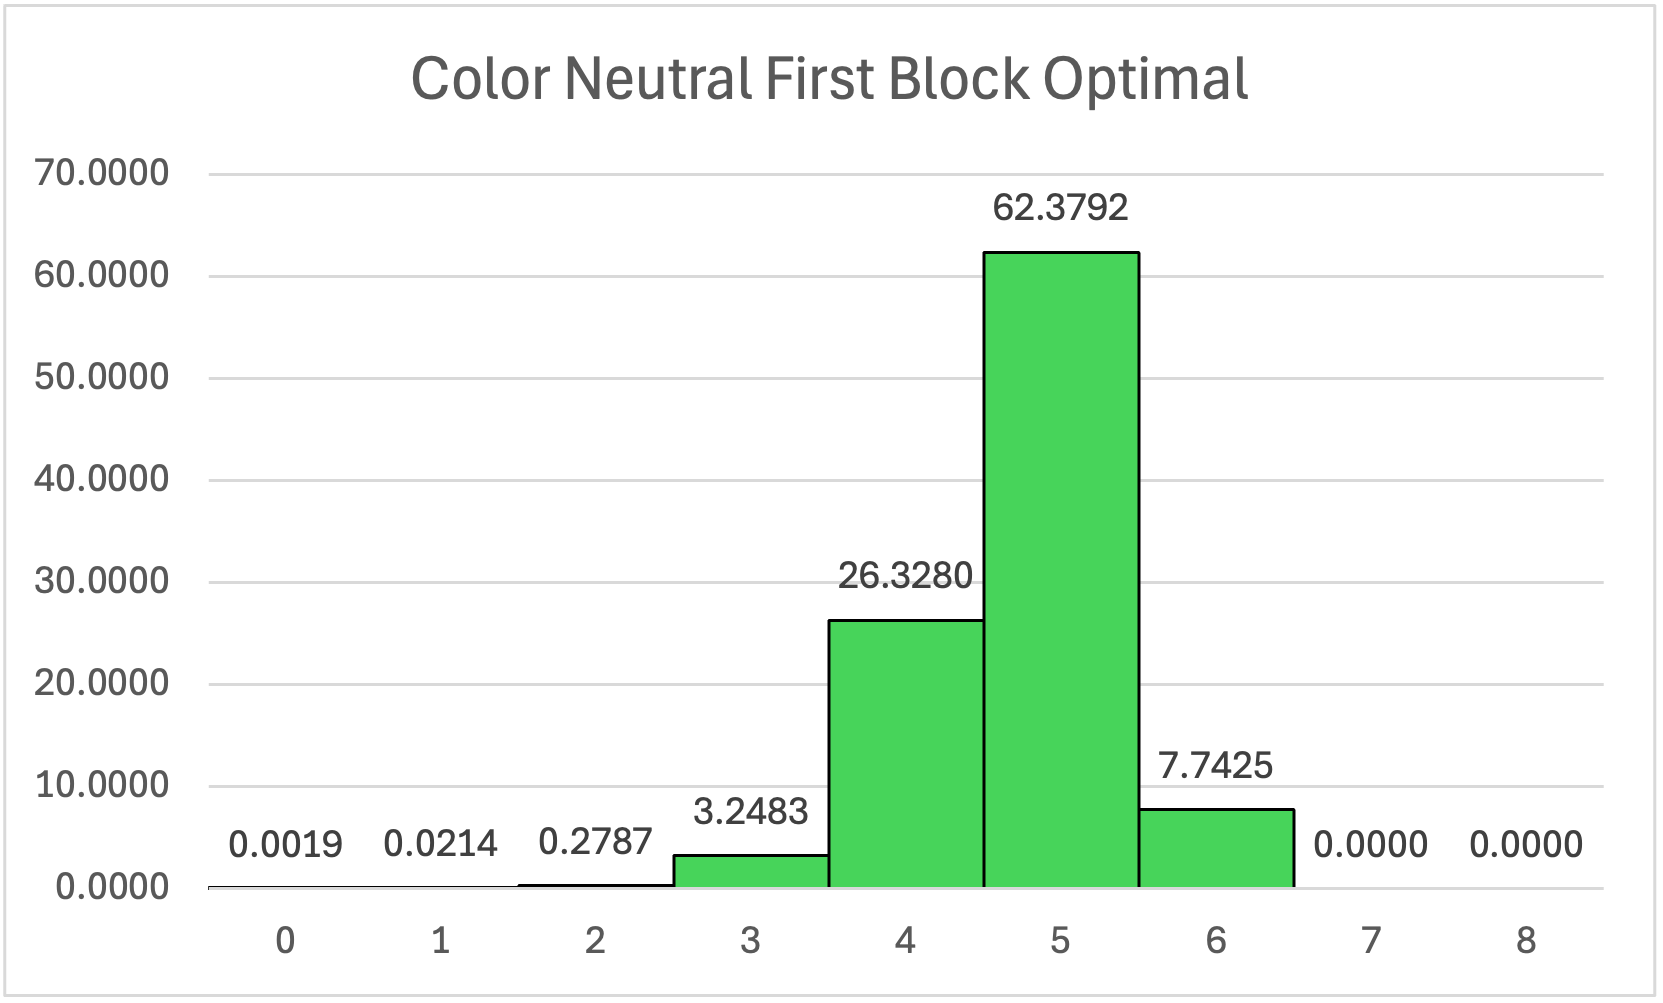
I also wrote some code to analyze being color neutral under y2 rotations, rotations generated by combinations of x2 and y2, rotations generated by combimations of x2 and y, and full color neutrality. For these there are too many cases to explicit solve all of them. Instead, I generated a large number (1330560 also, just by choice) of uniformly selected random cube states and found their optimal solutions at these degrees of neutrality. So, for any nonzero degree of neutrality the distribution I give is only a very good approximation of the exact one. In the plots below, the x-axis is the number of STM moves in an optimal solution and the y-axis is the percentage of cases taking that many moves. Finally, I wrote an optimal first block solver that will show you what the shortest solution is for any given scramble and degree of color neutrality.
First Block Neutrality Statistics
| Neutrality | Average Moves (STM) | Standard Deviation | Median | 90th Percentile | Max Moves |
|---|---|---|---|---|---|
| Fixed | 6.21 | .73 | 6 | 7 | 8 |
| y2 | 5.84 | .70 | 6 | 7 | 8 |
| x2y2 | 5.50 | .67 | 6 | 6 | 7 |
| x2y | 5.19 | .68 | 5 | 6 | 7 |
| Full | 4.74 | .66 | 5 | 5 | 6 |
Overall, full color neutrality versus totally fixed first block usually saves 1 or 2 moves. Because of this, I think that being color neutral is much less important than just getting better at block building in general. You are probably not averaging under 7 moves with fixed first block, and so still have room to improve. Once you are averaging under 9 moves, then it is probably worth it to work on neutrality. (Color neutrality makes recognition for the others steps of the method more difficult, and it will take a long time to make it more of a benefit than a cost.)
Novice
Please refresh yourself on cube notation if you need it (including slice moves, rotations, and wide moves). In this tutorial, I will always take green to be the bottom color and white to be left color when solving. I tend to pick up the cube so that the DL edge is where it belongs. When you are first getting started with FB, the easiest approach is to first solve the L center (making DL and L into a 1x1x2 block) and then solve the DFL & FL corner-edge pair and the DBL & BL corner-edge pair, in either order. If you have experience from CFOP, don't let it restrict your thinking on making those pairs, you have a lot more move freedom than the cross would give you!
The L center can always be solved in 2 moves or less and should give you no trouble. If it isn't solved, from anywhere on the E slice can be solved by an E or u move. If it is on the U or D face, just do an M or r move to put it on the E slice. To make the corner-edge pairs takes a little bit of practice. At first even if you have no trouble putting them next to each other, you may struggle to match orientations correctly. You want to first get the corner-edge pair to be one move away from touching and with the bottom color sticker of the corner on the face that you would turn to touch them. After doing this it is still possible that the edge could be misoriented. If the edge is misoriented then (before bringing the pair into contact) double turn a face that has one of them but not other. Now when you turn the corner aligning face to bring them into contact, they will pair correctly. Once you have made a corner-edge pair, it should be straightforward to insert it next to the rest of your block. It never takes more than 4 moves to insert a corner-edge pair and it will always end with an F face move for the front pair or a B face move for the back pair. Doing so, you might use a wide r move. Get used to it, Rouxers like those! Simply follow this pairing strategy for both corner-edge pairs and you should be done with first block!
To set up the examples, you can start with a solved first block and do the inverse of each solution. Pair attention only to the first block pieces!
 |
Example 1: Solving the L center. We take the Green-White edge to be solved, with Green our bottom color and White our left color. Solution: r' u |
 |
Example 2: Good Orientation. The L and DL pieces are solved. The FL edge and DFL corner are one move (just an R') away from being paired. You can tell the corner is correctly oriented because the bottom color is on the R face and you will turn the R face to pair it to the edge. You can tell the edge is correctly oriented because when a quarter turn away from pairing, the edge and corner stickers on the same face should be different. On the F face the edge has a Red sticker but the corner has a White sticker. Solution: R' F |
 |
Example 3: Bad Corner Orientation. Same as example 2, but the DFL corner is badly oriented for pairing because the bottom color is not on the pairing face. We need to turn the corner without moving the edge. Solution: R U then example 2 |
 |
Example 4: Bad Edge Orientation. Same as example 2, but the FL edge is badly oriented for pairing because it shares a face with its corner and before pairing they should show different colors on that face. We need to double turn either the corner or the edge but not both. We can move the corner away in 1 move, double turn it in a second, pair it with the edge in a third (a slice move this time!), and insert the pair in a fourth. Solution: R U2 M' F' |
 |
Example 5: Pairing with a U move. In the above examples you sometimes pair with an R face turn or an M slice turn. Sometimes you also pair with a U face turn, but the same rules apply. Solution: U F2 |
The same pairing advice and insertion rules apply for the back pair (BL and DBL) as well.
At Novice level, you should locate the DL edge and L center as well as one corner-edge pair in inspection time. You should be able to plan how to solve the L center but you don't have to fully plan the corner-edge pair, just know where its pieces are and how they're oriented. To work on your inspection, give yourself more than the standard 15 seconds until you can find everything and start your planning. Keep practicing with more than usual inspection time to improve your planning. You should be averaging under 13 moves for first block at the novice level. Roux is an efficient method! It is better to turn more slowly and have an efficient solution, because your thinking speed will gradually keep getting faster while your turning speed will much more quickly hit its limit.
Intermediate
You need to free your mind. You should not always solve the L center and then two corner-edge pairs anymore. Instead, you should think of first block as being made of either 3 pairs of 2 pieces or 2 pairs of 3 pieces (which one is better is different from solve to solve, but the first is more common). In the 3 pairs of 2 pieces approach, you need to pair the L center and any one of the DL, BL, FL edges and make the other four pieces of FB into two corner-edge pairs. You can insert your pairs before or after pairing another pair. Basically, in this approach you sometimes solve DL and L together the way you did before while sometimes you solve DL and a corner together as a corner-edge pair and instead solve the edge that would have gone with that corner in the novice method with the L center. The 3 pairs of 2 pieces approach typically means you build a square (1x2x2) and then the last pair and then form them together, so this is often called square & pair
.
Sometimes it is more efficient to solve first block as 2 pairs of 3 pieces, meaning 2 1x1x3 blocks. This is called the line method. Usually this means you solve the two edges on the E slice with the L center, then pair up all three pieces needed on the D face in a line, then combine the lines with a D move.
 |
Example 6: Classic 3 pairs of 2 u' pairs the White center to the Green-White edge. U' sets up the White-Orange edge for a B pairing with the Green-White Orange corner. U' B then inserts that pair. R2 U' sets up the White-Red edge and Green-White-Red corner to be paired. M pairs then and F inserts. Solution: u' U' B U' B R2 U' M F |
 |
Example 7: Lucky Square & Pair This would be a pretty lucky scramble. You already have two pairs made, the Green-White-Orange and Green-White pair as well as the Green-White-Red and White-Red pair. An M' pairs the White center with the White-Orange edge. An F2 preps that pair for a u insert to complete a 1x2x2 square. Notice this square wasn't built by first pairing the DL (Green-White) and L (White) pieces. Finish the block with an F2 insert. Solution: M' F2 u F2 |
 |
Example 8: Square & Pair This is a more average scramble. You have one pair, but that is pretty common. An R F2 pairs the Green-White-Red and Green-White together. A u2 then finishes the 1x2x2 square. r U sets up the Green-White-Orange and White-Orange pieces for a R2 pairing. B' inserts that pair. Solution: R F2 u2 r U R2 B' |
 |
Example 9: Making multiple pairs before inserting Remember to be open minded about the order in which you solve pieces. B' makes the Green-White-Red and White-Red pair. E makes the White center and Green-White pair. M' makes the Green-White-Orange and White-Orange pair. U2 r sets up the back pair for a B' insert. R U sets up the front pair for an F' insert. Solution: B' E M' U2 r B' R U F' |
 |
Example 10: Square & Pair Lookahead In inspection you should plan solutions that think about how piece movements interact. For this case I give an inefficient, a reasonable, and an optimal solution. The inefficient 8 move solution is U' F2 r E' M2 U R B'. U' sets up and F2 pairs Green-White-red with Green-White. r sets up and E' completes the 1x2x2 square. M2 U sets up and R pairs Green-White-Orange with White-Orange. Finally, B' inserts. The reasonable 7 move solution is U' F2 U r E' M2 B'. The added U between F2 and r makes the U R moves of the inefficient solution unnecessary. You could see this in inspection because that U move sets up the Green-White-Orange and White-Orange piece for an M2 pairing. The optimal 6 move solution is r u' F2 E2 M B'. r brings the White and White-Red pair into the correct layer. u' F2 pairs Green-White-Red with Green-White while setting up an easy pairing between White-Orange and Green-White-Orange. E2 completes the 1x2x2 square. M and B' pairs and inserts the back pair. Optimal: r u' F2 E2 M B' Good: U' F2 U r E' M2 B' Meh: U' F2 r E' M2 U R B' |
 |
Example 11: Don't cross the line! (AVOID THIS CASE) Sometimes the best solution is to make 2 1x2x3 lines. When doing so, never built the edge-center-edge line on the U or D face. If you build it on the F or B face, make sure it is a horizontal line. If you build it on the R face, it can be horizontal or vertical. If you mistakenly stick yourself with this crossed line case, the optimal solution is 4 more moves, which isn't very good after going through all the trouble to build this case. There is no way to unite these lines without breaking one of them first. Solution: B M2 B' u' |
 |
Example 12: Line solution Here is a healthy line solution. The scramble already has the White center paired with White-Orange (we are going to break the pairing between the White center and the Green-White edge). R sets up the Green-White-Orange corner to have the D color on the U face, which can be inserted easily, and places the White-Red edge so it can be easily aligned with the White center and White-orange pair. u' B2 pairs the Green-White-Orange corner to the Green-White edge. u2 F' pairs the Green-White-Red corner to the Green-White edge. u comples the White-Orange, White, White-Red line. R' u2 unites the lines. Solution: R u' B2 u2 F' u R' u2 |
At this level, you should locate all FB pieces in inspection and you should be able to plan either your first square or first line (depending on what you are using for that solve). You should be able to track the remaining FB pieces while you execute that solution. You should be averaging under 10 moves for first block at the intermediate level.
Advanced
You must unlock your third-eye. The biggest difference between intermediate and advanced first block solutions is the ability to think nonlinearly. Intermediate solutions are pretty linear in that they typically only advance one piece or block at a time closer to solution. Advanced solutions often will advance two completely separate piece pairs toward being solved in a single move. At the very least, you should be thinking carefully about how the FB pieces you aren't solving yet are being moved by your first few turns, so that you can set up good cases for your last pair or second line. It is difficult to give general advice here, just examples of what some good solutions look like. At this level it is really useful to use a first block trainer. Conveniently, I have built one. This lets you see what optimal solutions look like for a given scramble to help you learn to see things you didn't even know to look for. Below are some optimal solutions to give you a feel.
 |
Example 13: Efficient Double Pairing U' F pairs the Green-White-Orange and White-Orange, while breaking apart and setting up the Green-White-Red and White-Red for an R2 pairing. U' B inserts in the back pair. F inserts the front. Solution: U' F R2 U' B F |
|
Example 14: S move magic (same setup as Example 9) It is possible to do front and back moves simultaneously (these can even be phrased as an S slice move if holding the cube the right way). M r' sets up the Green-White-Red and White-Red pieces for an E' pairing. That same E' also pairs the White center with Green-White. Simultaneous F2 and B2 inserts the front pair and prepares the back pair for an R' pairing and B' insert. Solution: M r' E' (F2 B2) R' B' Equivalently: z2 M' l E S2 R' B |
|
Example 15: Advanced Square & Pair (same setup as Example 8) B' setups up Green-White-Orange and White-Orange for what could be an easy pairing by an M2, but instead do an M R. This still does the pairing but puts the Green-White-Red corner in good position for an F2 insert and pairs the White center with the White-Red edge for an E2 insert. B' inserts the back pair. Solution: B' M R F2 u2 B' |
|
Example 16: Classic 3 pairs of 2 (gigantamax-brained, same setup as Example 6) M pairs White with White-Orange. u r B places the White and White-Orange pair horizontally on the back face and places the corners of first block correctly relative to each other. R2 E simultaneously forms both the front and back pairs and pairs the White center with the Green-White edge. Simultaneous F2 B2 inserts both pairs. This is the kind of solution humans struggle to find. Solution: M u r B R2 E (F2 B2) Equivalently: z2 M' d l B L2 E' S2 |
|
Example 17: Efficient Line solution (same setup as Example 12) R u' prepares the Green-White-Orange corner for insertion and the White-Red edge to be paired with the White center White-Orange edge line. Simultaneous F2 B2 pairs the Green-White-Orange corner and prepares the White center White-Orange edge line to be paired with the White-Red edge. R2 prepares the Green-White-Red corner for an easy insertion. U completes the edge-center-edge line. F inserts the Green-White-Red corner. u unites the lines. Solution: R u' (F2 B2) R2 U F u Equivalently: L d' S2 R2 U F u |
 |
Example 18: Efficient Line solution Thinking ahead is important. M2 puts the White center and White-Orange edge in positions that will be advantageous later. U2 pairs them together and sets up the Green-White-Red corner for an F' insert. R' completes the edge-center-edge line. B2 completes the corner-edge-corner line. u unites the lines. Solution: M2 U2 F' R' B2 u |
 |
Example 19: Efficient Line solution B2 solves the Green-White-Orange corner. M2 F' u' moves the White and White-Red pair to good position to soon be paired with the White-Orange edge and also moves the Green-White-Red corner into position to be solved. F' accomplishes both of these, finishing both lines. u2 unites the lines. Solution: B2 M2 F' u' F' u2 |
At this level, you should be able to fully plan your FB solution in inspection and able to locate at least one edge (usually DR) that you will need for second block. You should be able to track that second block piece during your FB execution. Very advanced Roux solvers can be able to inspect and track an entire 1x2x2 square of second block. Given that Yiheng Wang is able to at least sometimes plan all of F2L in inspection for CFOP, it is humanly possible to get good enough to inspect all of first and second block. You should be averaging under 9 moves for FB at the advanced level. In theory, in STM you can always do it in 8 and more than 99% of the time you can do it in 7, but humans are not yet that good at blockbuilding in real time.
Once you consistently can solve first block in 9 moves, you should work on developing degrees of color neutrality. The easiest one to learn is to be y2 neutral, as it basically just swaps which colors you do for first and second blocks. Next you should learn x2y2 neutrality, as it keeps recognition for LSE basically the same. x2y neutrality is a little harder because it makes LSE recognition more difficult, but it is still worth it at high levels. The highest level current solvers tend not to actually be fully color neutral, and instead stop at x2y neutrality. Whether full color neutrality is worth it is unclear.